Once you start using these Adobe Premiere Pro features, you’ll wonder how you worked so long without them.
Are the you video editor who has to cut everything, then recut social media edits, make YouTube thumbnails, and everything in between? Here are five Adobe Premiere Pro CC features that will make your life easier and help you edit faster.
Whether you need to take a video and export multiple deliverables like vertical or square social media edits, or you client wants you to pull one of their old videos and recut parts, here are a few underrated and powerful tools that can help you knock out those projects faster in Premiere Pro.
1. Automatically Add Cuts with Scene Edit Detection
This is a “trick” I have used a surprising amount of times since first learning of it. It has practical uses for when you are working on a project, and it’s also super helpful when you are studying videos, scenes, or commercials you admire.
At some point in your career, a client is going to ask you to rip one of their old videos and pull a clip or two from it. Odds are you had nothing to do with the first video, so you need to rip it from the companies YouTube or Vimeo account. Then you have to scrub through and find the shots you need. If you need to pull multiple clips, the easiest way to do this is use Premiere’s Scene Edit Detection.
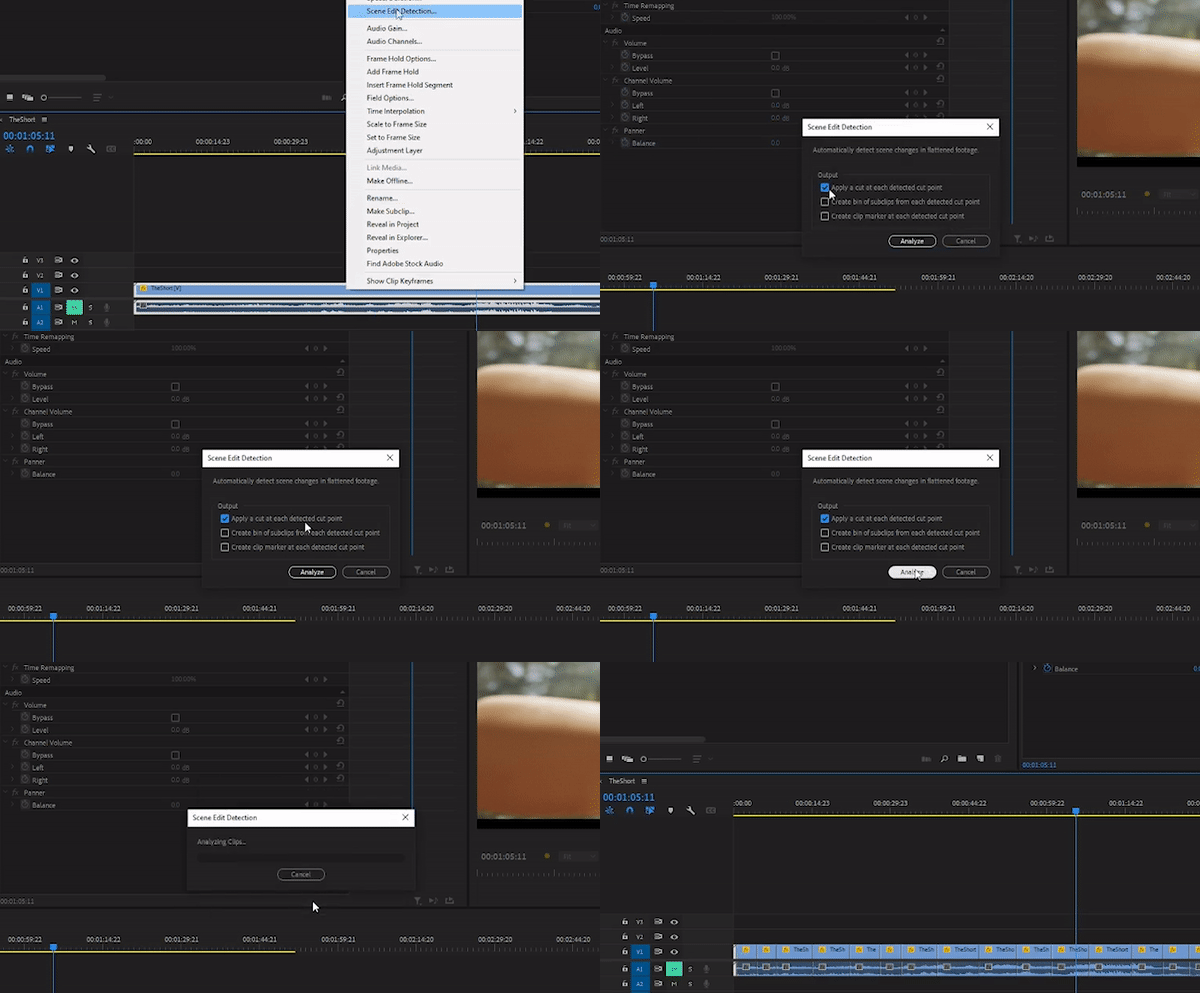
If you put a video that has been previously edited onto your Premiere Pro timeline, it will import as one big clip. To find the edit points, just right-click on the clip and select “Scene Edit Detection…” This will open up a prompt where you can either just have Premiere add the cut points in the timeline, or you can create a bin with each of the clips, or just add clip markers.
2. Auto Reframe Videos for Social Media
You finally finished the edit at everything was approved. You think you’re done, but far from it. You still need to cut the social media versions in 1:1, 4:5, and vertical 9:16. Good news is that it isn’t as incredibly tedious as it has been in the past. Now you can have Adobe Premiere Pro create a social media sequence for you automatically, even having Premiere search for subjects in the frame and put them in the center of your social media canvas.
It isn’t perfect, but it makes a great starting point and then all you have to do is tweak and adjust shots until you’re happy with the social edits. This is a HUGE timesaver and a very underrated feature.
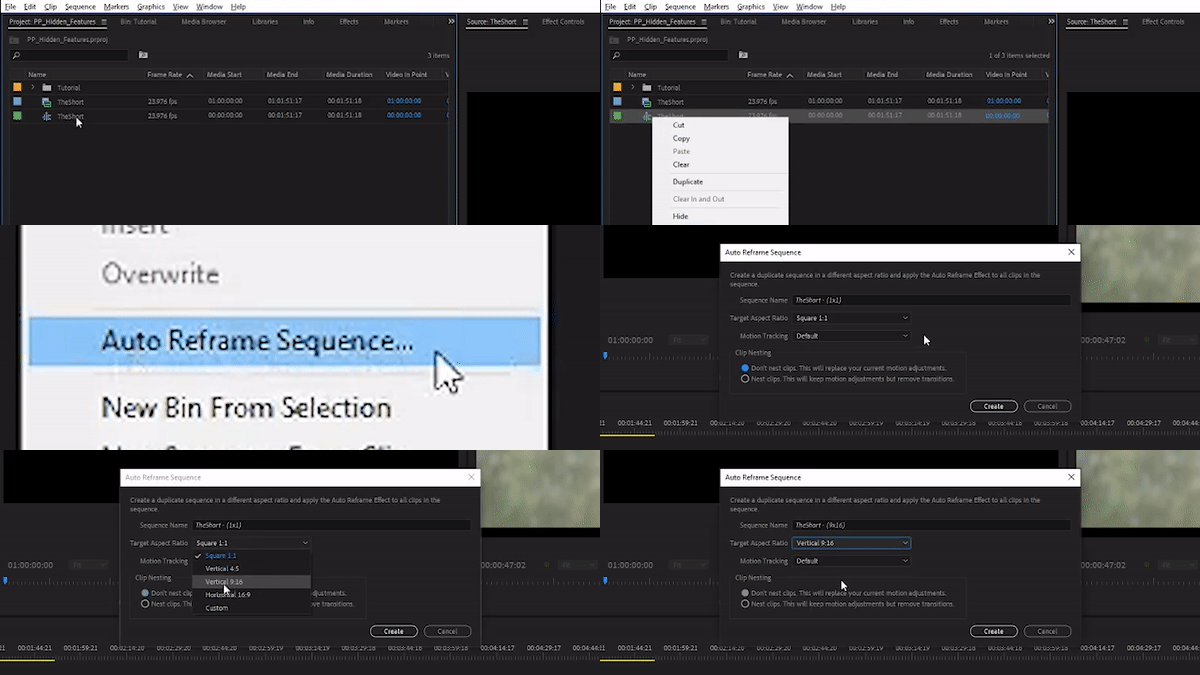
Right-click on your sequence in the Project folder and select Auto Reframe Sequence. Then select the type of sequences you need (1:1, 4:5, 9:16, 16:9, or Custom). Premiere Pro will duplicate your sequences with the new sequence settings and then work to Auto Reframe every single clip on the timeline. Give it some time as it runs in the background, so grab that coffee refill or finally take a bathroom break. When you return your social sequence should be ready for tweaks and adjustments.
3. Using MOGRTs for Titles and Lower Thirds
I am not going to sugar coat it or defend it. The default Text tool in Premiere Pro is trash. It’s heavy, clunky, and causes more frustration than anything. I never use it. For text titles that are still or animated, I always use MOGRTs now. These Motion Graphic Templates were designed for the Essential Graphics panel and delivered a much needed overhaul to Premiere Pro’s graphics and text.
You’ll find some MOGRTs included with your Premiere Pro subscription, more on Adobe Stock, and then there are thousands or MOGRTs online both free and paid. The best ones are made in After Effects and bring some Ae flair into Premiere with animated text that has proper motion blur, easy-ease keyframes, and more.
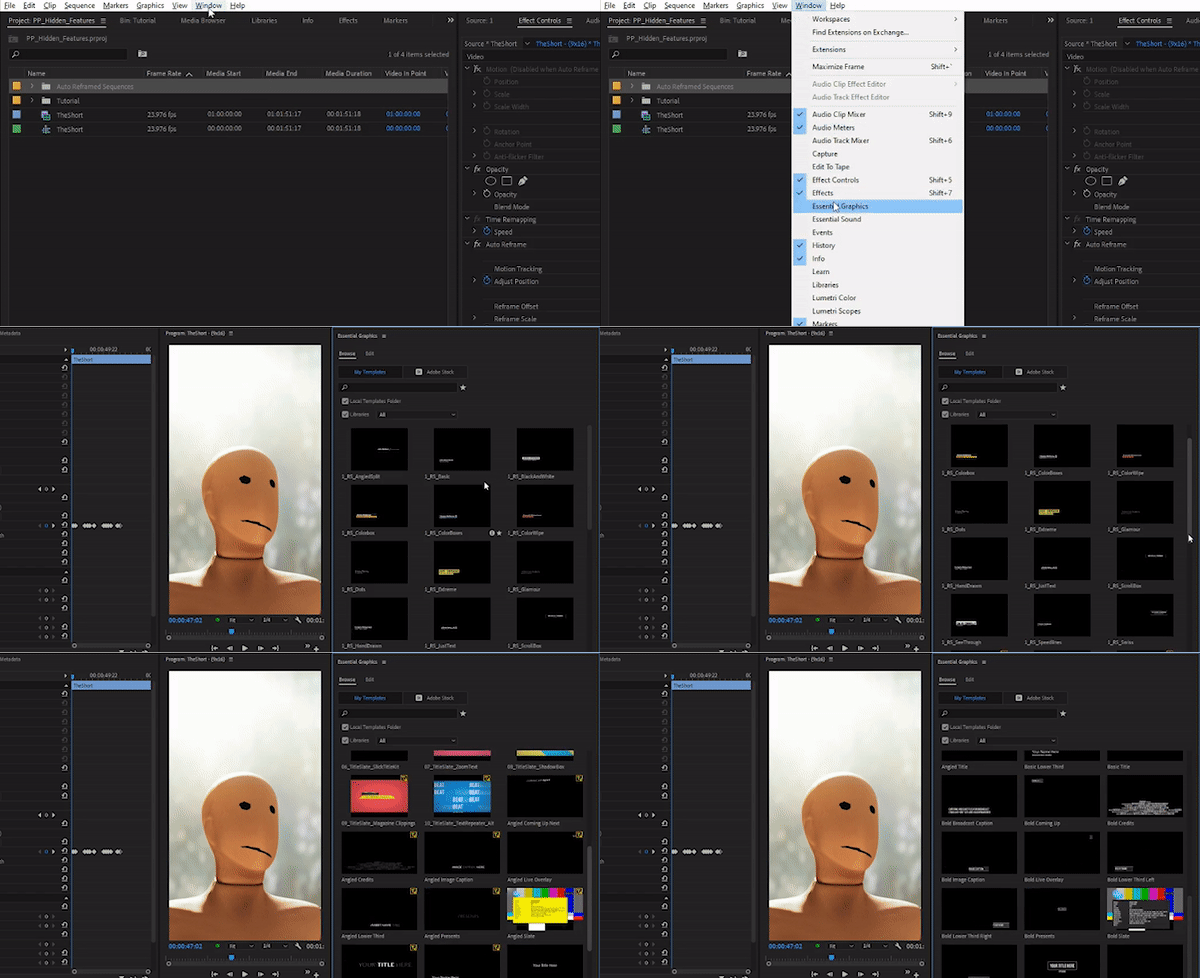
To use MOGRT’s, open the Essentials Graphics panel under the Premiere Pro Window menu. Browse through MOGRTs or install your own to use. I have included links to many of my favorites below. Then once on your timeline, just open the Edit tab of the MOGRT and adjust all the options you have access too, including text, font, colors, sizes, and more.
SuperMOGRT and FREE Premiere Pro Motion Graphic Templates
Seemingly all the MOGRTs I use were made by Todd Blankenship, including SuperMOGRT. Here is a collection of some of his best templates you can use in your next Premiere Pro project.
- SuperMOGRT ($10 Limited Time Offer)
- Free Horror Movie Trailer Titles
- 15 Free Animated Lower Thirds
- 21 Free Motion Graphics
- 15 Free Textured Transitions for Premiere Pro
- 10 Free Motion Graphics Templates
4. Guides, Rulers, and Snap to Place
Trying to align text or graphics in Premiere Pro? Did you know there are Photoshop-style tools in your Program monitor? In addition to the standard Safe Margins view, you can also make custom guides and grids.
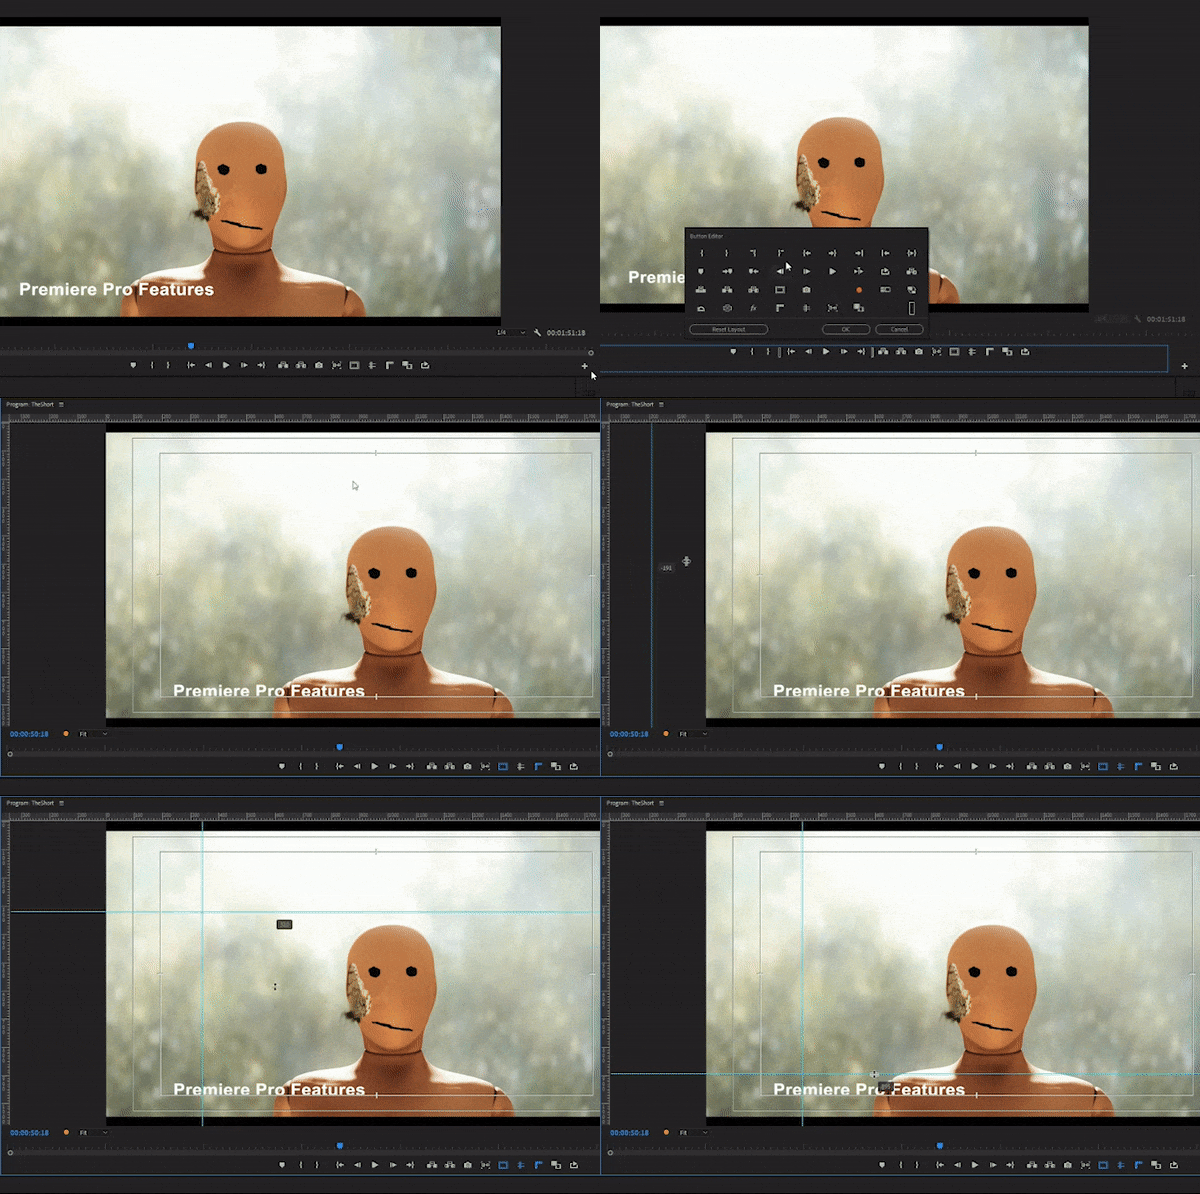
Add the Rulers and Guides buttons to your Program monitor. Turn them on and add guides wherever you need to place them. This is very helpful for aligning multiple text layers or MOGRTs together. If you also end up adding multiple lower thirds, you can make sure they are always in the exact same spot by setting up a reference guide.
5. Screenshot for YouTube Thumbnails
Of all the tools and features mentioned above, this is probably the tool I use the most. Exporting stills from either your source video or the program monitor is incredibly powerful, quick, and easy. Need to send an color corrected image for approval? Click the camera icon. Need to send the text copy and design to the client? Click the camera icon. Need to extend a clip for a few frames, go to the last frame, click the camera icon, and add that image to the timeline.
Perhaps the feature I use this for most often is the creation of YouTube thumbnails. You just click the camera icon, choose the export format (usually JPG or PNG) and that’s it.
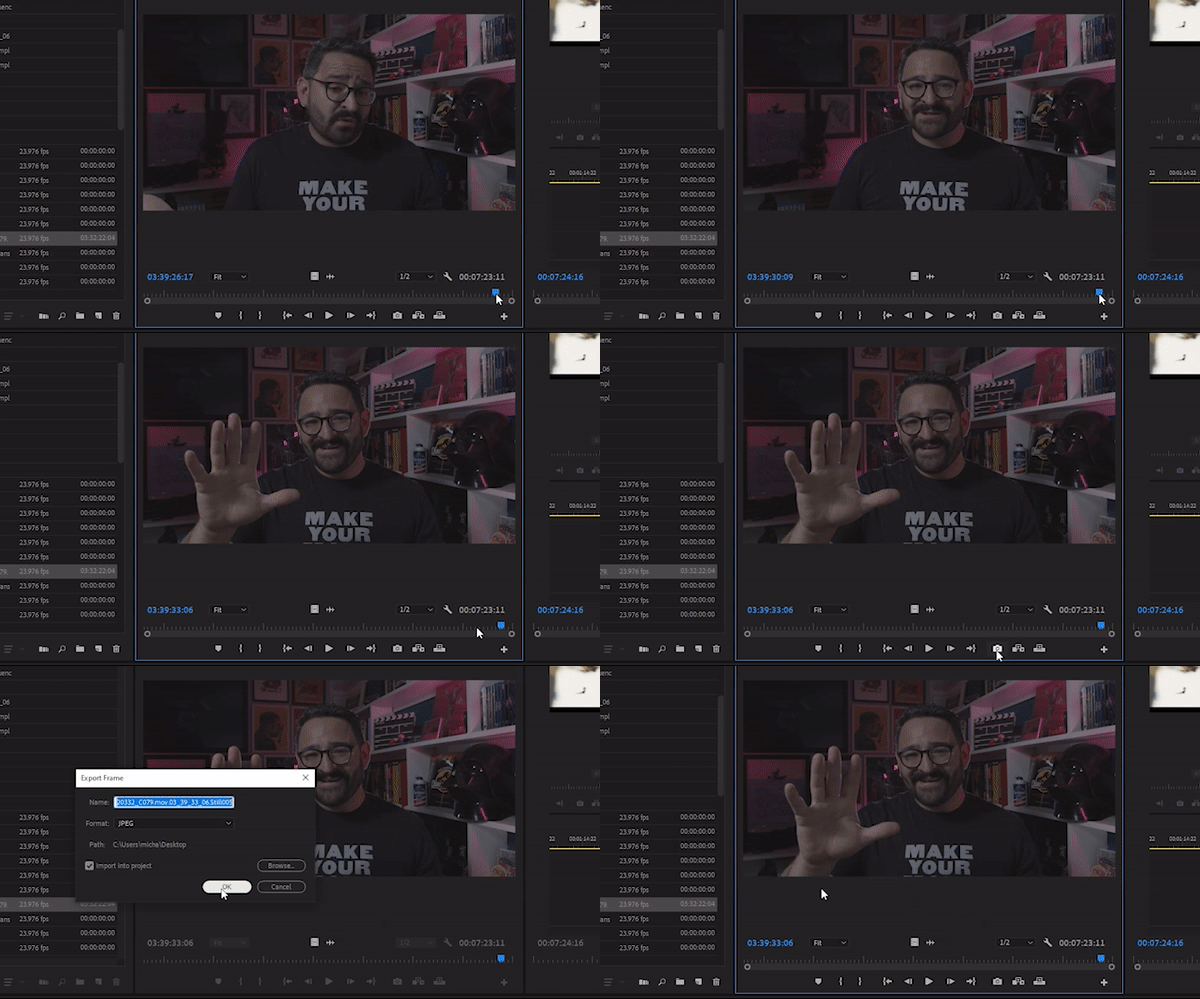
You can even have the image automatically added to your project so you can keep it handy. Just right click on the image and you can open it directly in Photoshop to create the YouTube thumbnail. It’s exactly what I did for this video.
Hope you find these tips helpful and handy. Till next time!


